Today I’m preparing and packing up my gear, and Big Bertha so I can head out on a week long road trip to Maine. This will be a working road trip which means I’ll be working during a good part of the day but I’ll be making time for some photography as well. For this trip my goal is long exposure images. I’ll be living on the coast with access to plenty of bodies of water for sure! I am also planning on hitting Acadia National Park and exploring a little bit in that area. The pink granite and the beautiful Penobscot Bay would make for some amazing long exposures I’m hoping. I also plan on heading northward towards the Canadian border. There is a very small community up there, Lubec, which has some great views of Canada of course, but has a very quaint waterfront. On the way back I’ll probably stop in Bar Harbor and pick up some fresh seafood for dinner. In addition to my goal of long exposure images with my medium format Fuji I also plan on flying my drone extensively on this trip. This is something I honestly don’t do enough of so I’m going to try and change that on this trip. I’m hoping to come back with some hang-worthy images but we shall see.
In addition to my medium format gear and the drone I am taking my XH-1 with the 16mm F1.4 in case I have the opportunity to do some star gazing. Unfortunately I do not have the patience for that but we’ll see what develops. Either way the XH-1 and the 16 1.4 are a truly AMAZING combination. The 16 1.4 in my opinion is Fuji’s BEST LENS ever!
That’s all for now as I need to get back to packing.
Today since I’m on vacation and had nothing else to do I decided to take an image and process it in the new LR feature called “Enhanced Detail”.
First I shot the image (obviously), then I imported the RAW file into Lightroom. As you can see the image is from the Fuji 50R at full resolution, 8256 x 6192 size. It was shot at 1/160th, F11, ISO 400 handheld.
Once I imported the RAF (RAW) file I then right clicked on the image and selected “Enhance details”. I timed the process – it took 4 minutes and 36 seconds to process the RAF file into an “Enhanced dng” file back in LR.
For this process, since I’m on the road, I’m using my travel Mac which is a Late 2014 MacBook Air with 256G HD, and 8G of ram. Of course, a newer machine will most likely be faster. Just an FYI if you do not use LR you can still use this process in Adobe Camera Raw. Now the question is should you, or will I use it? Probably not. Why? because in all honesty I do not see that much of an increase in detail to warrant the time involved in processing, nor the extra file size. My RAF file is 117mb whereas the enhanced DNG file is 262mb. I’m posting here a couple of screen takes from within LR but in all honesty I do not see the difference at 100%. Do you? Maybe a little tiny bit of extra resolution around the license plate but I don’t think this is anything I cannot achieve with a few tweaks in Capture One, which is what I use to process all my RAW files from my Fuji X and medium format systems.
Here are the screenshots. You be the judge… And please let me know what you think.
Well I’m headed out once again. Since late April, I’ve been on the road more than at home. And, it’s no different Thanksgiving weekend. I’m headed to Charleston, South Carolina to shoot and have some fun while I’m there. For this trip I’m only packing my Fuji X-T2. For lenses I’m taking the Fuji 16-55 2.8 for the classic landscapes, the 50-140 2.8, my fabulous 18-55 2.8-4.0 to use when walking around town, and at the last minute I threw in the Zeiss 12mm 2.8/Touit. I was actually taking some photos of the Zeiss in order to put it on eBay but decided last minute to take it with me one last time — I just wanted to give it one more shot (pun intended) before I list it for sale. I’m leaving behind all the primes including my prized 16mm 1.4, plus my other 1.4 primes. I’m also packing my Mavic Pro Platinum for some aerials, some spare drone and seven camera batteries plus some filters. All of this fits in my Amazon Basic camera backpack which I have to say that for a whopping 39.95US has been used now over five years, and it’s still amazing! Out of my twelve camera bags, it’s the bag that always hits the road with me. The bag has a ton of room, plus a laptop pocket that holds my 15″ MacBook – but on this trip only my 11″ MacBook Air is traveling with me in order to keep it light(er).
In addition to the Amazon backpack I’m also packing a small, lightweight Lowepro which holds my camera body with grip (if I choose to carry it) and lens, plus an extra lens and my batteries. It literally weighs ounces and I can fold it up and stick it in the outside pocket of my backpack or store it in my luggage.
So, I’ll be off now… Take care. Have a fantastic Thanksgiving holiday for those of you that celebrate it.
Fuji X-T2, 23mm 1.4 laying in the sand, using the rear LCD
Since i received my X-T2 about two years ago I’ve been playing with the memory card configuration. I’ve tried all the option: Sequential, Raw/Jpeg, and Backup.
Sequential: It just works. No worries. Fill up the card in slot 1, and the camera automatically rolls over and begins using slot 2. A no brainer there. Great for casual shooting, and casual shooters — of which I’m neither.
Raw/Jpeg: This is the option I’ve most often used. I always shoot raw/jpeg anyway but wind up keeping the raw files, and deleting the jpegs 90% of the time. This option makes it so much easier not having to load both jpeg/raw’s together. I just pop the card containing the raw files out of the camera, and import my images into LR. Easy enough. The only problem I find is if the card containing the raw files is for some reason corrupted or somehow damaged I’m left with only the jpegs. Now don’t get me wrong, the jpegs are nothing to sneeze at; as a matter of fact, the fuji jpegs are just amazing out of the box but as a travel, landscape and stock photographer I ‘really’ need those raw files. Granted, I’ve been shooting digital since 2002 (back then using “Smartmedia” cards in my Fuji 4900z) and in all this time I’ve only had one card go bad on me. This particular CF card actually worked and I would have never, ever know it wasn’t working – that is – until I pulled the card out of my D700 at the time, uploaded the images to my computer and discovered that a Nikon raw file was missing every four-five images! I would never had known this if I had just formatted the card, and went on my merry way. This is why I always purchase, and test, test, test. I wound up returning the card for a refund, but continued to use my other Transcend cards with full confidence. Frankly, I think it was just a bad sector on the card, that formatting both in camera and in computer did not fix.
Backup: This is it. This is nirvana! Yes. I found it. This week, after much trial and error and flip-flopping between the three methods I’ve decided to use this option going forward. Even though I have not experienced a catastrophic card failure while out in the field, I still feel much better knowing that I have a “backup” of both jpegs and raw files on card 2. The way I’ve set this up is to use a 32G card in slot 1 of the X-T2, and then use my 128G card as a backup in slot 2. Yes, the backup card is massive; I normally would never, ever use a card this large in any camera but for backup? Why not.
There are two very important reasons why using very large memory cards is not the most optimal solution:
Two cards, identical speeds, 32G and say 128G or 256G, the smaller card will ALWAYS write and read faster. Proven point.
Using smaller (32G) cards doesn’t put all your eggs in one basket. If something happens – camera is stolen, you drop it in a lake while photographing beavers (been there, done that) at least you will only lose the images on the card at the time. I recall a story from a workshop leader of a woman on a 10-day excursion into the Amazon. She had one huge CF card in her camera. On their last day there, they were at a local roadside cafe where she, for some reason, decided to pop out her memory card, and promptly dropped it in a puddle of water. Images lost. 10 days worth. So, no. DO NOT place all your eggs in one basket. Think of it this way: You’ve paid for the gear, you’ve gotten yourself to a great location, got the images you came for. Are you going to risk losing it all because it’s all on a single card? Heck no.
So for me it’s now 32G in slot 1, and my 128G in slot 2 for backup purposes. That 128G will stay in there until it’s full which means I can run through FOUR 32G cards in slot 1 before the 128G card needs to be wiped. So my images will remain on there for the duration of the trip, or until I get home, upload them, and decide I’ve got what I need.
On another note, but along similar lines: Once I have a card full, and it’s removed from the camera, that card is NEVER, EVER in the same location as any of my gear. Why? Because of the nature of my work, if my gear get’s stolen, or lost, the most important asset – the images – are safe, on my person. In practice if I’m shooting all day, get back to my room and then decide to go out to get a bite to eat, sometimes the cameras stay in the room, however, the memory cards are with me. The images I’ve taken become the most important asset to me after the cards are ejected from the camera. I can replace the gear, but not the photos… At least that’s how I see it.
Hope this post helps you out now or in the future. thanks for reading.
I’m back from several road trips to shoot stock and travel. I’ve been to Maryland, Ohio, The Florida Keys, New York, Maine, and Prince Edward island/Canada.
This was an amazing trip. Many, many wonderful people, and even more memories and images.
I thought I would share some stats with regards to the cameras, and lenses I used.
Here wo go:
First of all, my iPhone 7 Plus! I broke down and bought the 7+, in Red, with 256G of memory. The camera is amazing with the twin lenses; and I downloaded some apps including Camera+. I shoot in raw (DNG) format and the quality is totally amazing! I took a total of 1,771 iPhone images which is unbelievable for me as in all honesty I despised iPhone images.
On to the camera: Of course I took the X-T2 with me. That go’s without saying. This is a recap from the metadata found in LightRoom.
Tout 12mm/2.8 690
Fuji 16mm 1.4 1336
Fuji 18-55 2.8-4 1671
Fuji 23mm 1.4 732
Fuji 35mm 1.4 1134
Fuji 55-200 2234
Fuji 60mm 2.4 2523
So, 10,320 images with the Fuji series, and 1,771 with the iPhone 7+
Now, I have the job of culling, then editing the images. This’ll be fun!
As I go through Images I’ll post some here… I had a few up, but decided to take them down as I didn’t feel they did these various road trips any justice.
The tack sharp and reasonably fast Fujifilm 60mm 2.4 Macro. Why’d I buy that you ask? Well I’ll tell ya pardner.
I was considering the 50mm F2. At 449.00 on Amazon it seemed like a good buy; except, like it’s two other siblings – the 23F2 and the 35F2 its just freakin’ ugly. Plain and simple. I knew the 60 F2.4 Macro was what I needed even though I have the extension tubes for my camera. Anyway the 60 2.4 was a tad high priced at 679 or 699.00 US – I can’t remember which.
Anyway, I’m shopping the web and came across a deal for a brand new, boxed 60mm for $479.00! I couldn’t pass it up! I killed two birds with one stone – actually more as I’m getting a slightly longer focal length; better looking lens, crystal clear and tack sharp lens at that! And I saved over $200.00 to boot — or if I look at it logically, because I would not have purchased the 60mm for the 699 price tag, I got a dual purpose lens for the same price as the 50mm!
I just received it last night and this image here was one of my first seven images with the lens on my X-T2. I have yet to play with it at length. Light was dwindling fast, but on everything I shot on my walk around the block focusing was reasonably fast. Now, when I went inside and tried to take some images there, it is darn slow. I mean creepy crawly slow. I’m ok with that as I knew what I was getting into so no big deal here. But man o man is it slow. LOL. Once it locks on it’s razor sharp. Do I wish it were faster? Heck yes but I did not purchase this lens for speed, but for the clarity, sharpness, and close-focusing capabilities so I am thrilled with it!
The image above is from the raw file. No adjustments other than sharpening. And it’ll make you bleed if you get too close.
I’m in love! I can’t wait to take it out for a real spin.
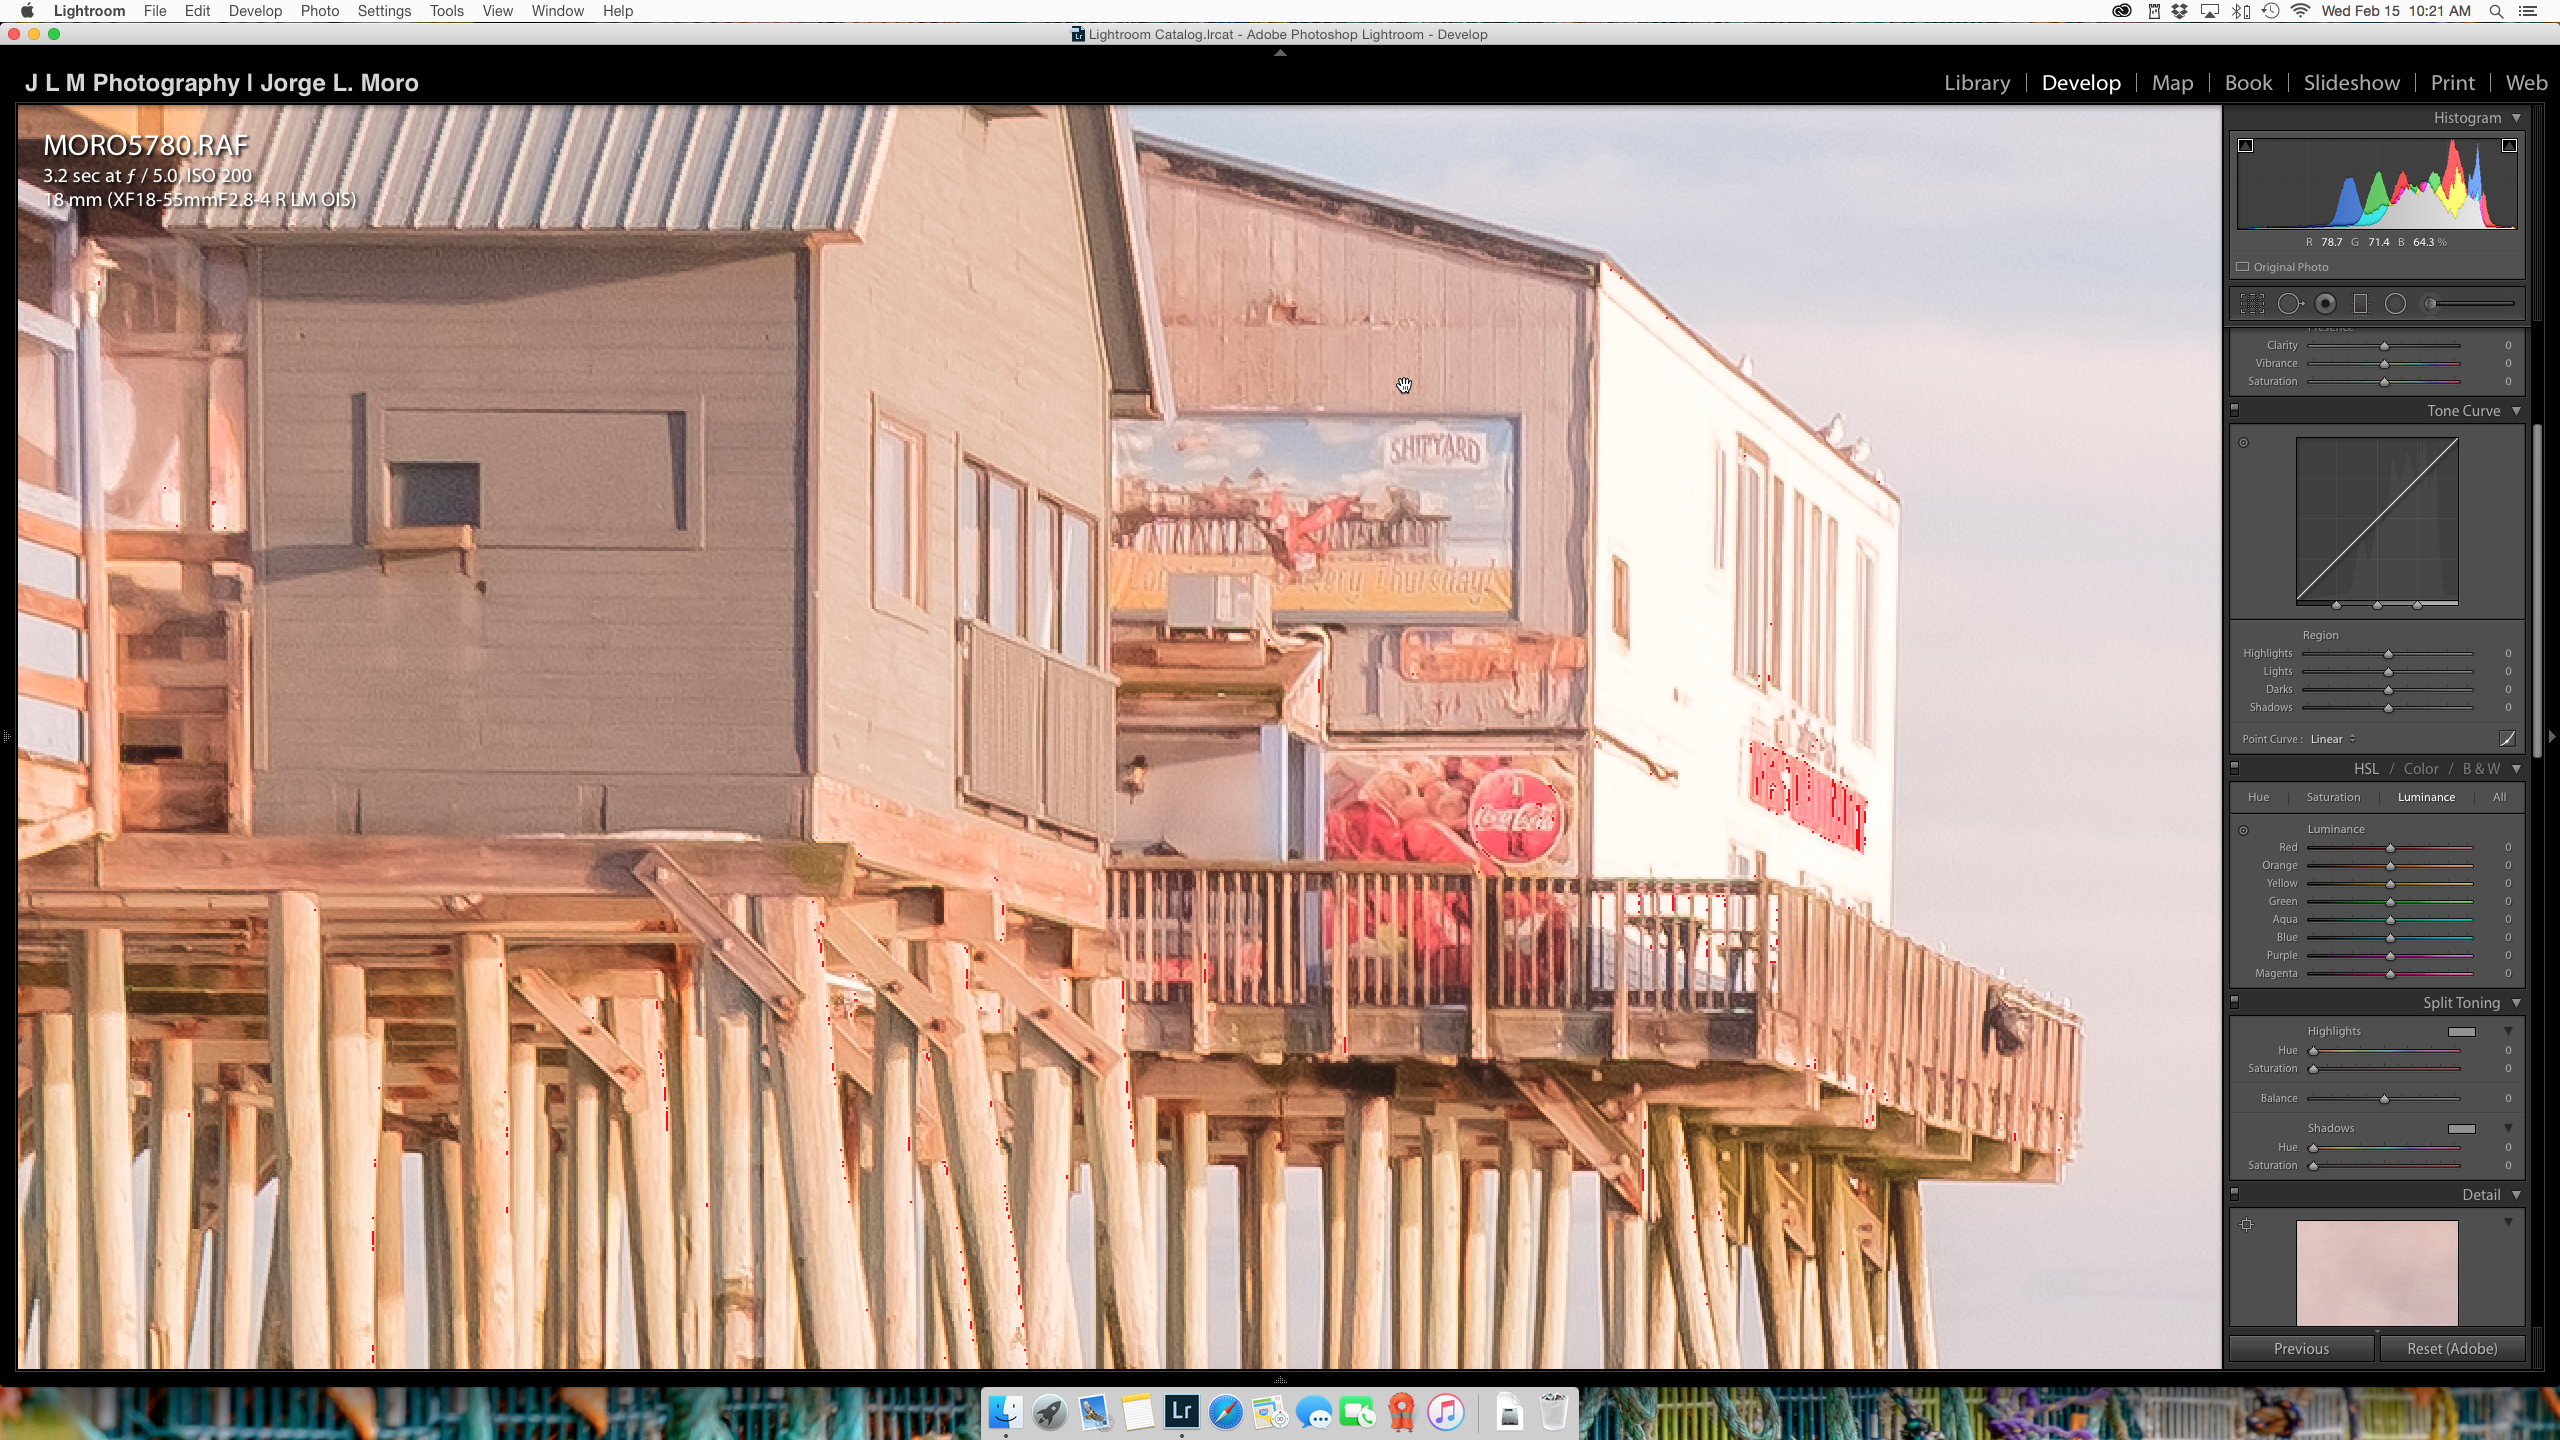
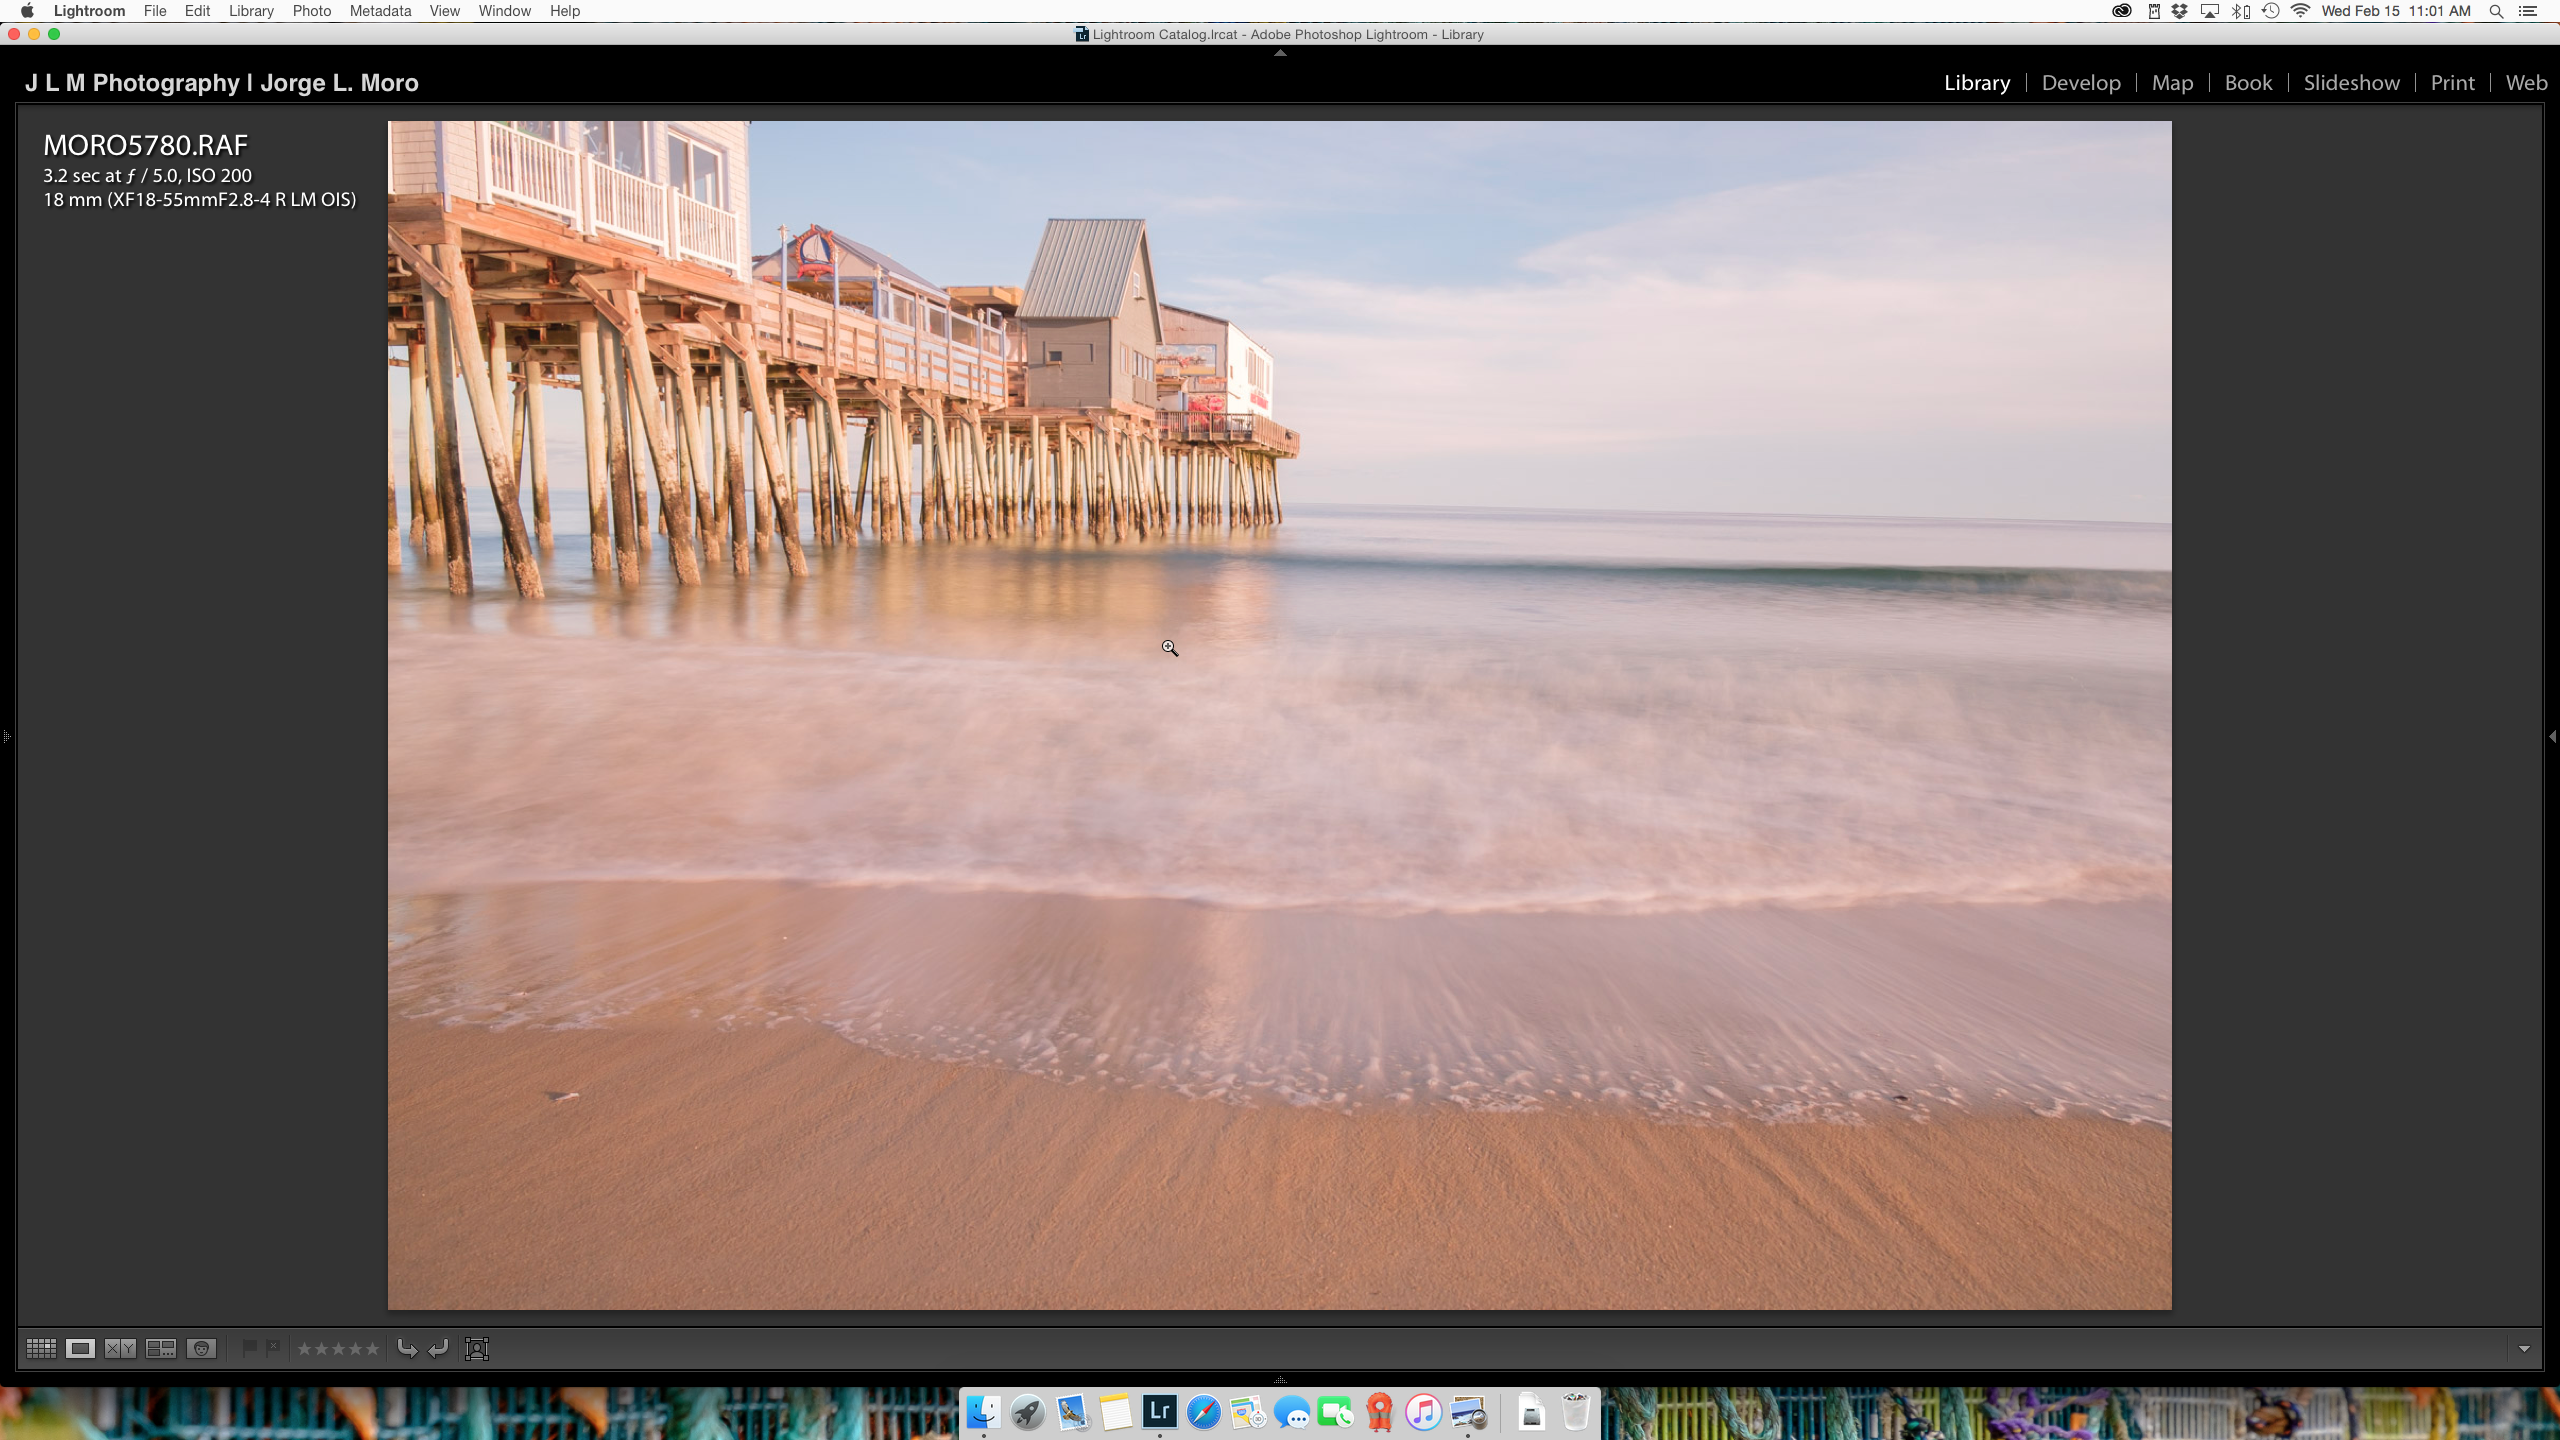
I have written about the Fuji 18-55 in the past. However, on New Years Day i was shooting up in Old Orchard Beach in Maine using this wonderful little lens. It’s lightweight, solidly built, and oh so darn sharp!
As proof how sharp this this little puppy is, check out this screenshot of my lightroom image of Old Orchard Beach at 200% — Yes. 200% !! This is the raw file, Sharpened with 100% details, 41 pts of sharpening. Then below it is the full screen! Now, look at that sharpness and clarity!! I can read the Shipyard Beer sign out on the pier and that isn’t even dead center; more like top center!
Would the 16-55 2.8 be sharper? Meh. Maybe. But this is pretty darn freakin’ sharp for me, and the weight/size savings alone are, to me, worth the tiny loss of sharpness. I’d rather be more light and mobile. Your mileage may vary.
2016 was a rockin’ year! I received the blessing of a 3rd Grandson which is the grandest of all gifts. Stock sales, though down in the market overall, I made up for in volume! What that means is a ot of more work, for basically a small increase in income. Volume rules at this point; gone are the days of licensing an image for 40 – 50 bucks when anyone can go online and pick up an image for a quarter. Oh well, such is life.
On another but related note I am now dSLR free. It’s a double-edge sword and my feelings are torn. I sold the last of my Nikon gear – being the D800e and a 50mm 1.8 lens. I am now all in on Fuji with the X series cameras and lenses. Will I miss those glorious 36 megapixel files? At times I’m sure I would but in order to have those files, I had to shoot them, and in all honesty, as you can see by the stats I rarely used the camera!
So, here is a re-cap of my 2016 stats, cameras first, then lenses.
Nikon D800e: 1,371 keepers
Fuji X-T1: 4,117 keepers
Fuji X-T2: 4,503 keepers (purchased in September 2016!!)
16mm F1.4: 1,514 keepers
18-55 2.8-4.0 Zoom (my don’t leave home without it lens) 1,489
23mm F1.4: 1,094 keepers
35mm F1.4: 2,256
Fuji 55-200 Zoom: 2057 keepers
Zeiss 12mm F2.8: 135 keepers. Most unused lens, but when you need it you need it!
That’s pretty much it for my year. Hears hoping to a profitable, successful and FUN 2017.
On my way to the office this morning my car was rear-ended by the guy behind me, who was hit by someone behind him. So, my car be totaled. that’s the bad news. The good news is I had my car flat bedded to my mechanics shop where, while he worked on it to make it safe, and drive-able, I photographed one of his new additions. It’s a rusting hulk (soon to be restored) 1952 Ford Firetruck! That’s the good news.
While waiting for my car I spent over an hour photographing this thing of beauty. It was raining, misty, and the lighting gave the faded red paint, and the rust a soft, warm patina that is hard to duplicate.
Here is the first image I looked at tonight. It’s with the X-T2, 35mm 1.4, handheld. Processed the raw as a Classic Chrome, then I processed it in the FANTASTIC Acros film simulation. I am so taken back by the image quality of the camera in general, and then the Acros is like the cherry on top!!
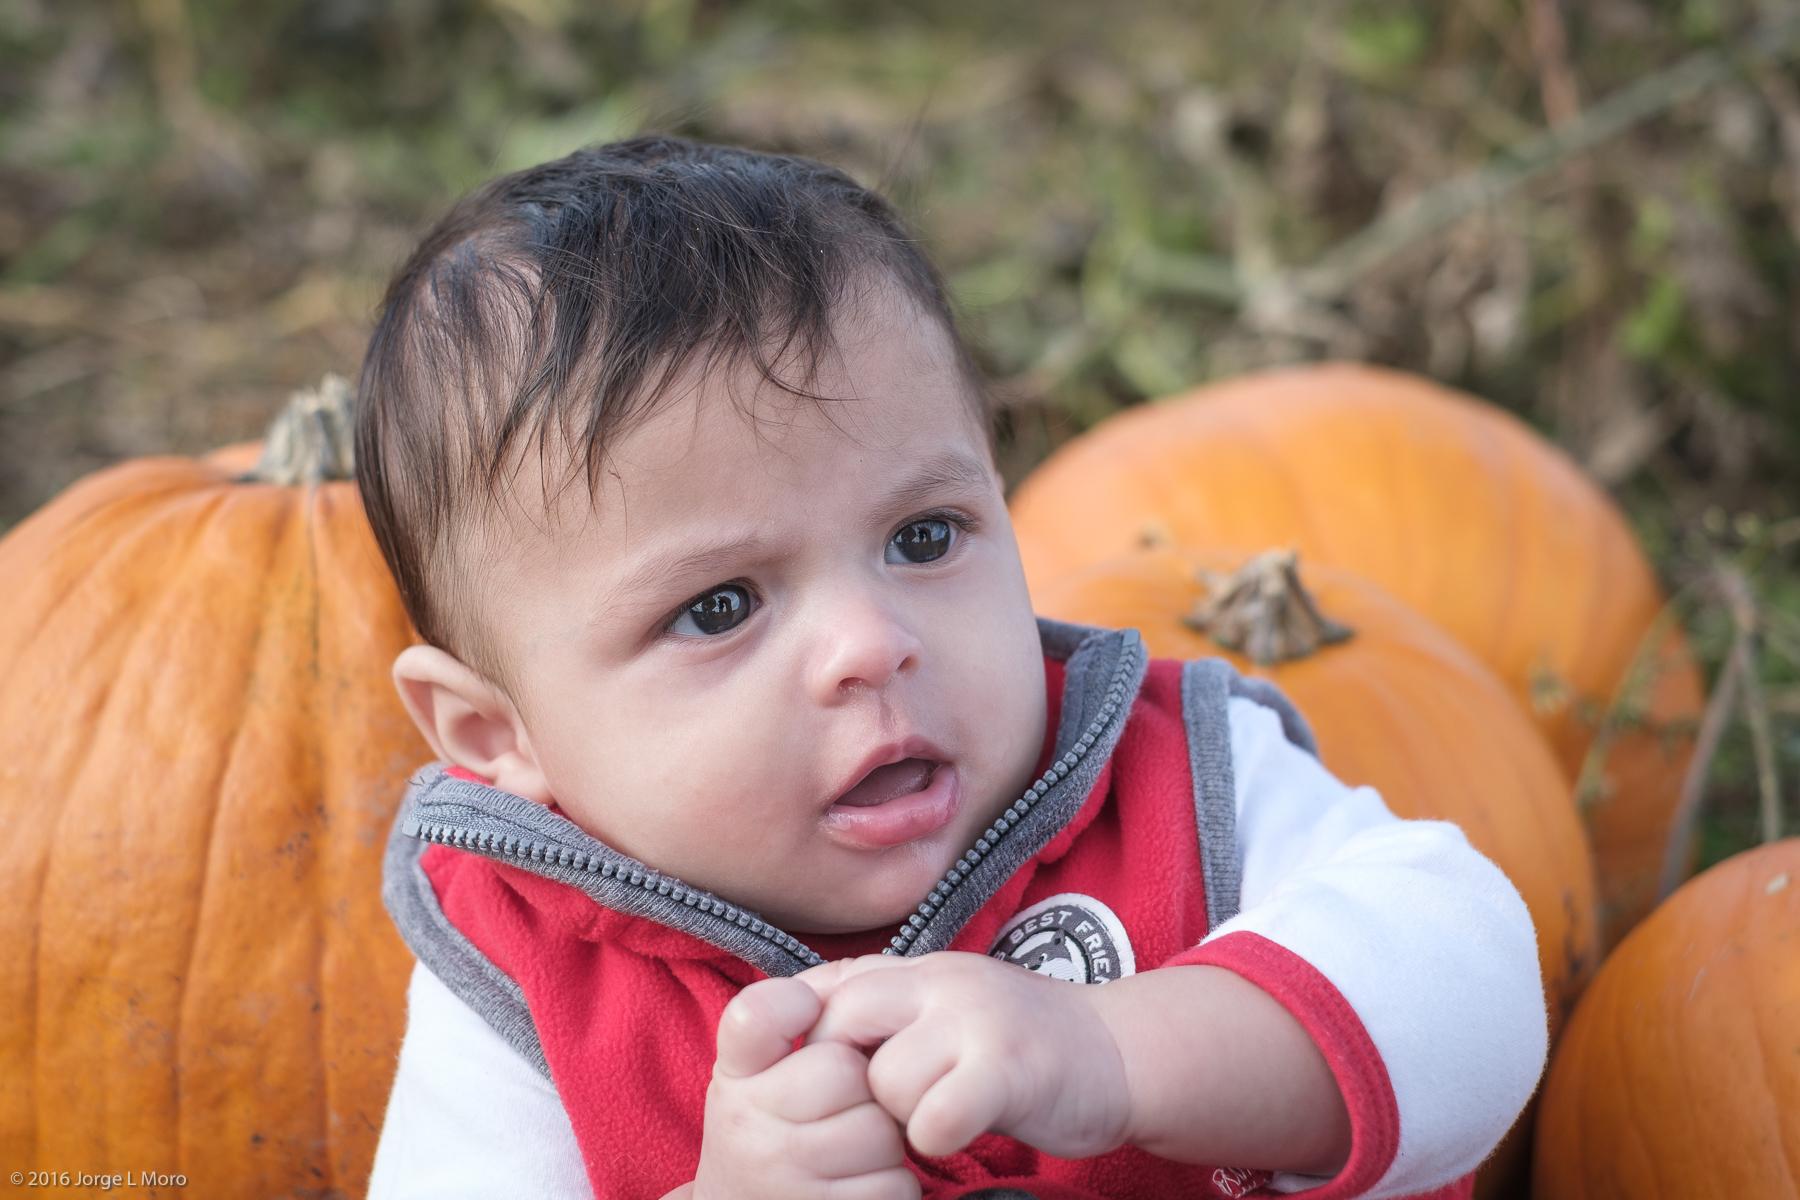
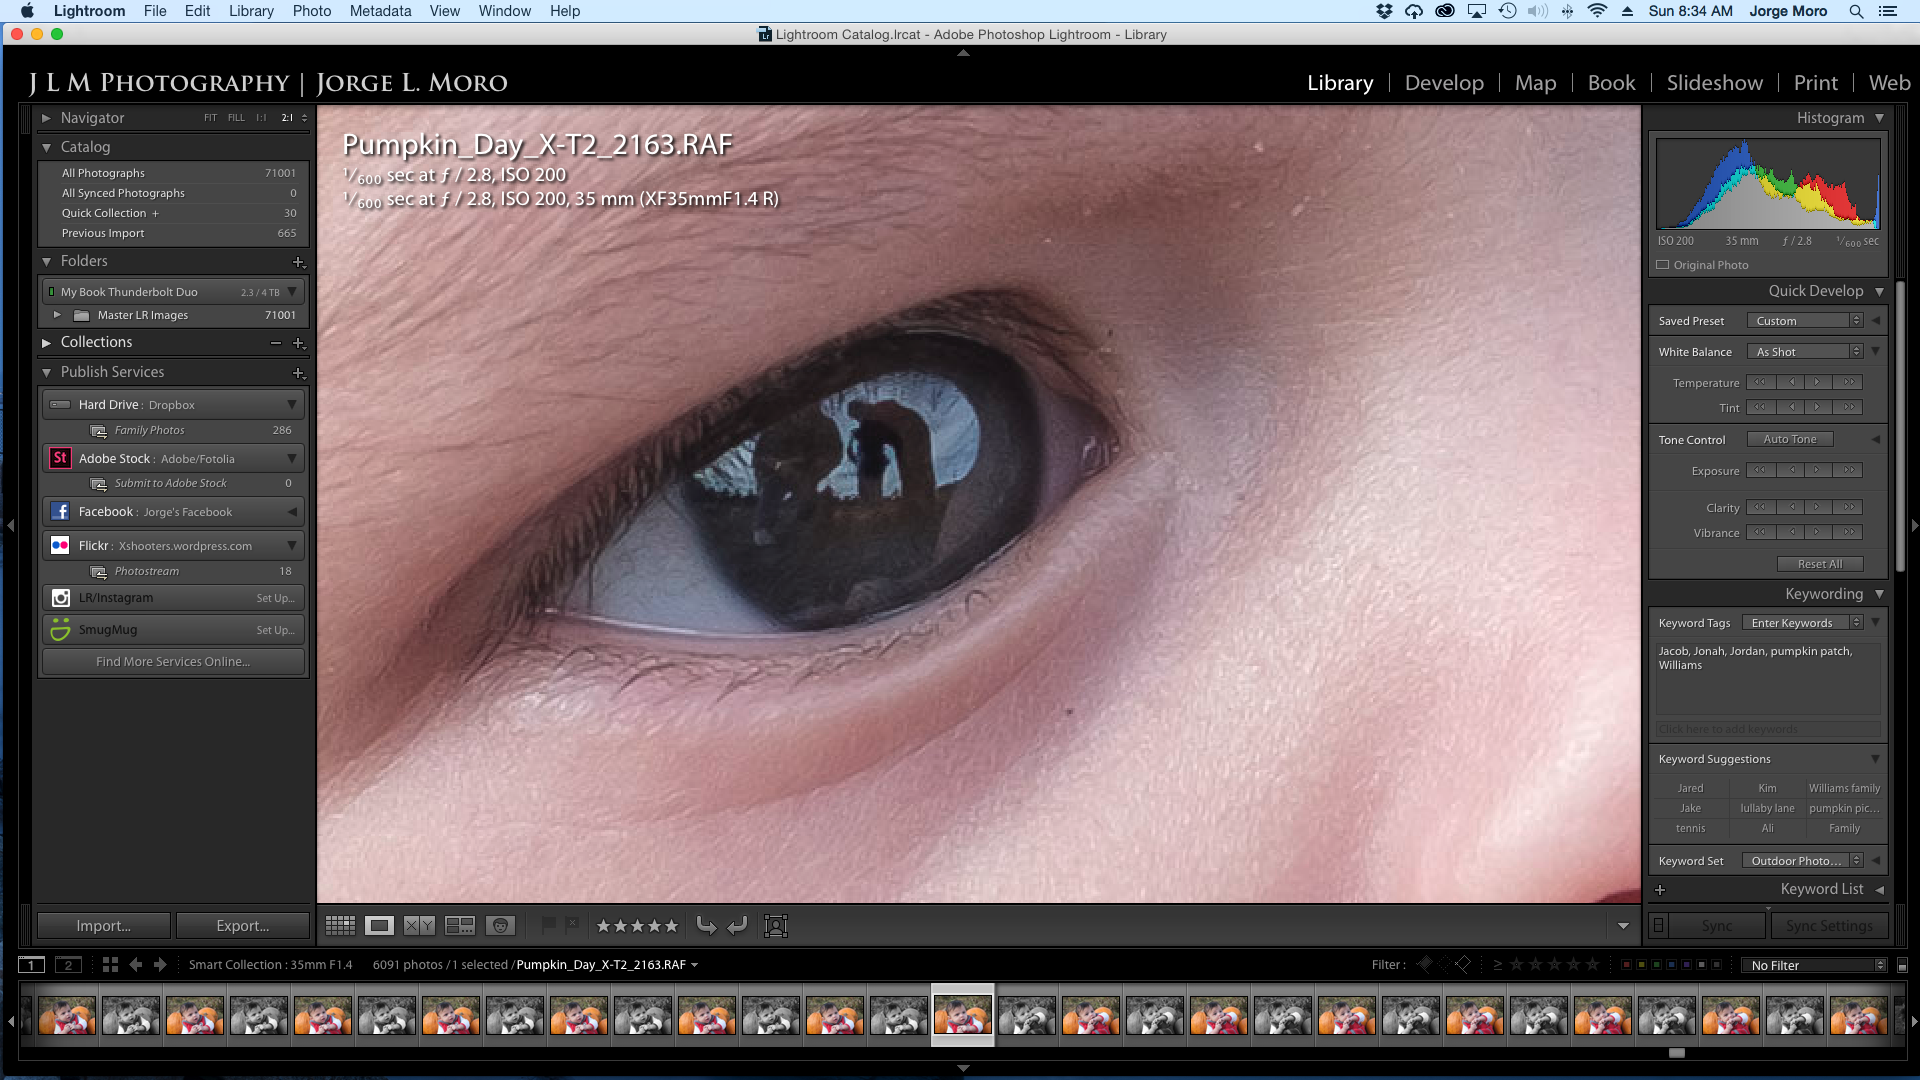
A couple of images here. My grandson, Jonah. First is the original image (from raw). I shot the entire day with the 35mm F1.4, The X-T2, Acros + G filter. This is the JPEG from the raw file, processed in Classic Chrome.
Now below is the SCREENSHOT of the same image, at 200 PERCENT as viewed on a 46″ display! You can see me, and Jonah’s dad in his eyes!!! Dang…….